由于微信的流量封闭,想要轻易的看到微信里面的内容是比较困难的。为了能爬微信公众号里的文章,有网友使用python实现了,一起来看看他的实现思路与代码,说不定能拿来用呢?要知道微信公众号里的内容百度可是没收录的,要能搞下来,简直爽歪歪。
开发工具
- python
- pycharm
- selenium
- tkinter
- xlwt
思路
首先start_url=”https://mp.weixin.qq.com/”,扫码注册一下微信公众平台,有的话直接忽略,扫码登录即可。(注册个人订阅号就行),利用selenium自动操作扫码登录获得cookie值,之后响应要用cookie
要先下载webdriver插件,插件你下载对应谷歌浏览器的版本,下载之后会获得chromedriver.exe,然后把这个chromedriver.exe放在python解释器的python.exe文件的同级目录下就可以了,响应拿回网页源码,拿回token值,token值是有时效性的。
首先打开公众号,在图文编辑中点开超链接。
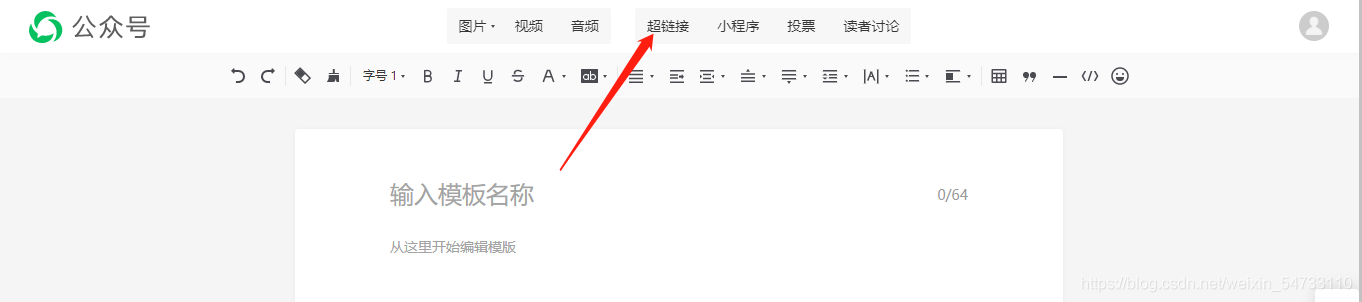
用python爬取微信公众号文章
用python爬取微信公众号文章
用python爬取微信公众号文章
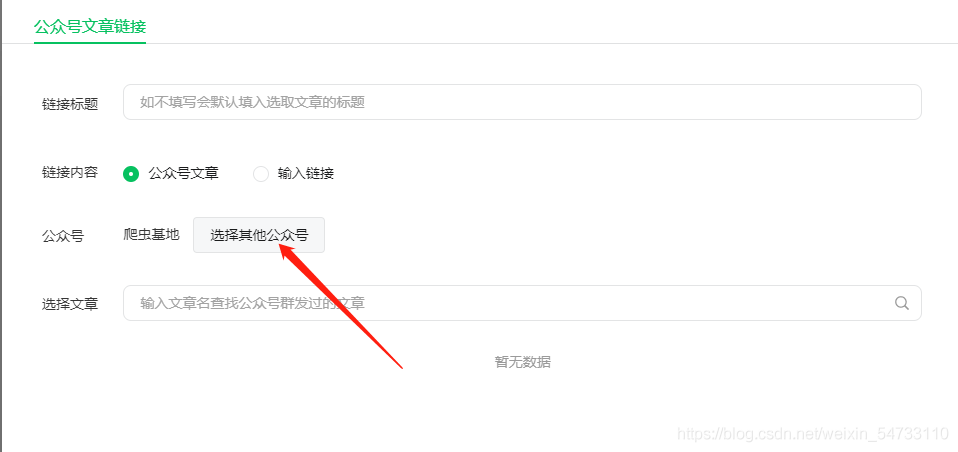
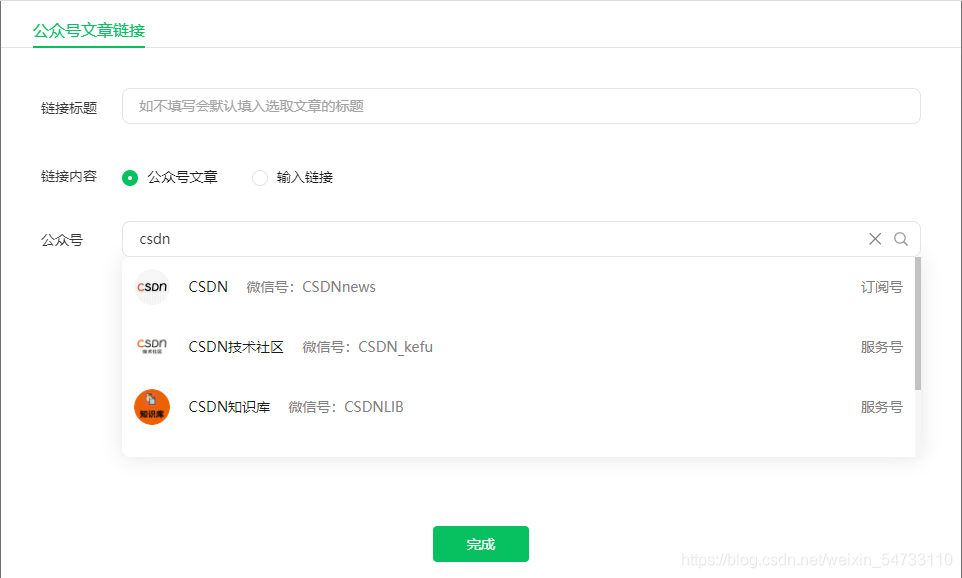
按下F12,看看公众号对应的fakeid值。
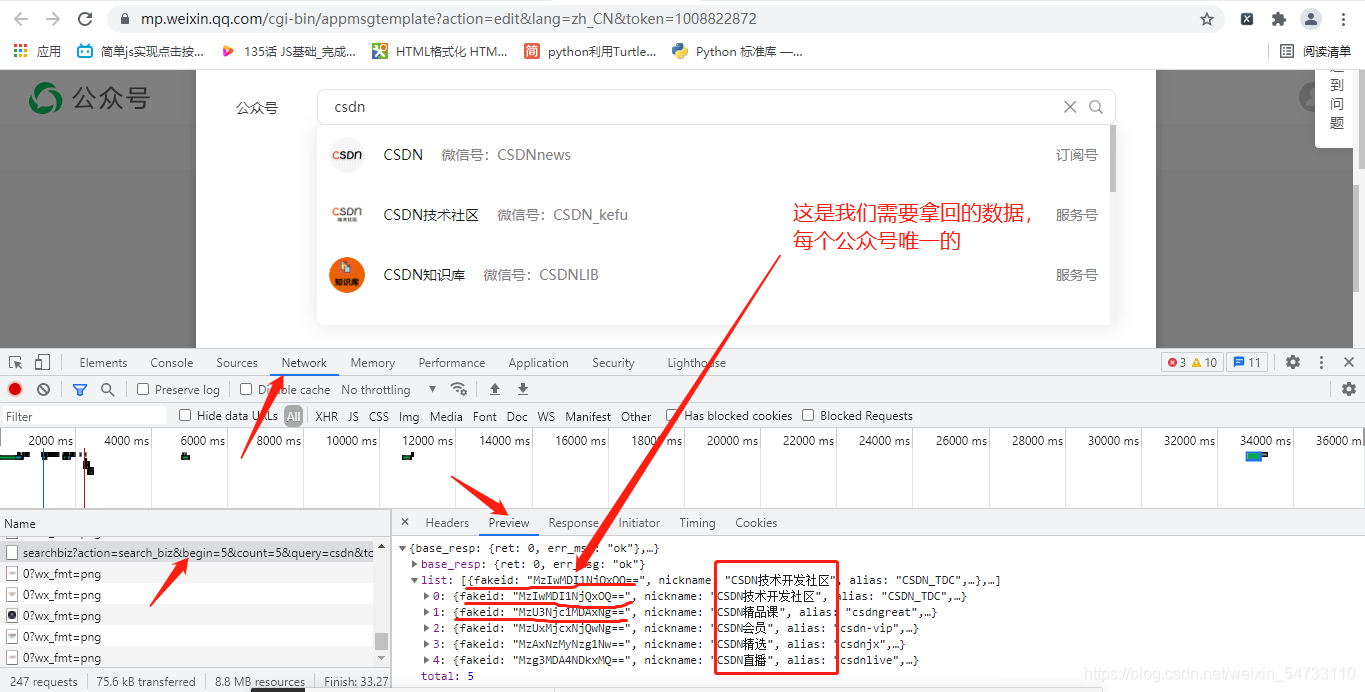
用python爬取微信公众号文章
用python爬取微信公众号文章
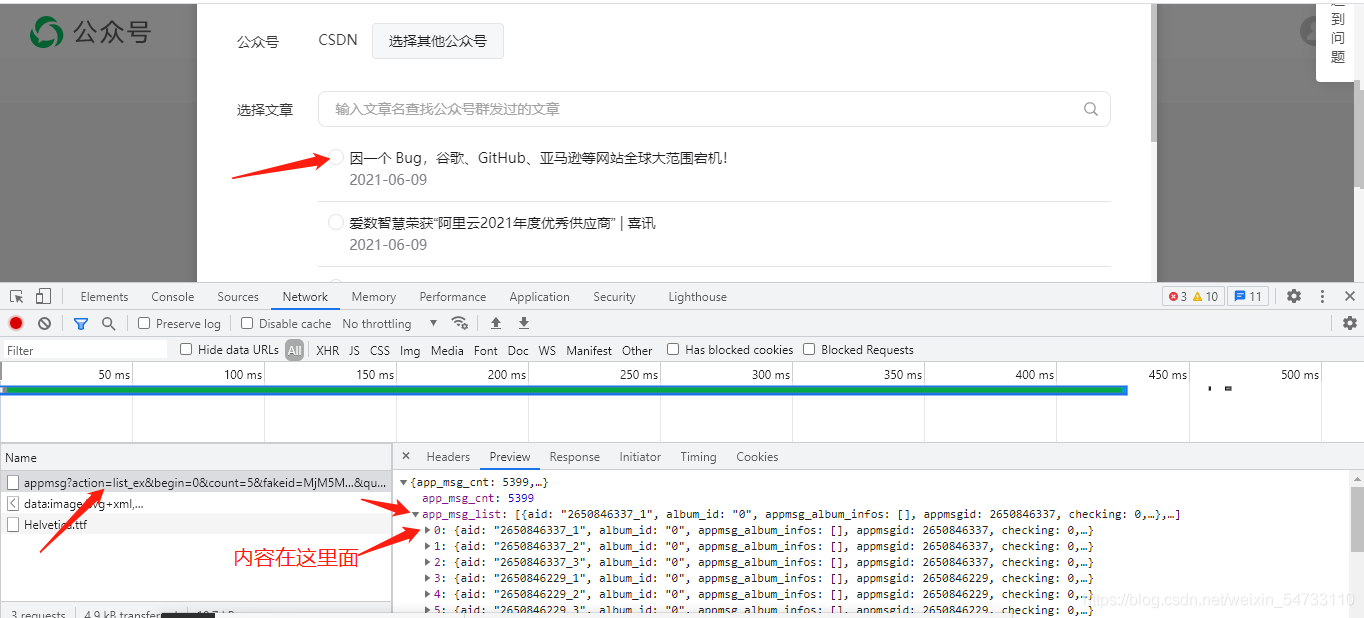
翻页打开headers,拿回第一页url地址
https://mp.weixin.qq.com/cgi-bin/appmsg?action=list_ex&begin=0&count=5&fakeid=MjM5MjAwODM4MA==&type=9&query=&token=1008822872&lang=zh_CN&f=json&ajax=1
第二页地址
https://mp.weixin.qq.com/cgi-bin/appmsg?action=list_ex&begin=5&count=5&fakeid=MjM5MjAwODM4MA==&type=9&query=&token=1008822872&lang=zh_CN&f=json&ajax=1
发现规律,上代码
# !/usr/bin/nev python
# -*-coding:utf8-*-

import tkinter as tk
from selenium import webdriver
import time, re, jsonpath, xlwt
from requests_html import HTMLSession
session = HTMLSession()


class GZHSpider(object):

def __init__(self):
"""定义可视化窗口,并设置窗口和主题大小布局"""
self.window = tk.Tk()
self.window.title('公众号信息采集')
self.window.geometry('800x600')

"""创建label_user按钮,与说明书"""
self.label_user = tk.Label(self.window, text='需要爬取的公众号:', font=('Arial', 12), width=30, height=2)
self.label_user.pack()
"""创建label_user关联输入"""
self.entry_user = tk.Entry(self.window, show=None, font=('Arial', 14))
self.entry_user.pack(after=self.label_user)

"""创建label_passwd按钮,与说明书"""
self.label_passwd = tk.Label(self.window, text="爬取多少页:(小于100)", font=('Arial', 12), width=30, height=2)
self.label_passwd.pack()
"""创建label_passwd关联输入"""
self.entry_passwd = tk.Entry(self.window, show=None, font=('Arial', 14))
self.entry_passwd.pack(after=self.label_passwd)

"""创建Text富文本框,用于按钮操作结果的展示"""
self.text1 = tk.Text(self.window, font=('Arial', 12), width=85, height=22)
self.text1.pack()

"""定义按钮1,绑定触发事件方法"""

self.button_1 = tk.Button(self.window, text='爬取', font=('Arial', 12), width=10, height=1,
command=self.parse_hit_click_1)
self.button_1.pack(before=self.text1)

"""定义按钮2,绑定触发事件方法"""
self.button_2 = tk.Button(self.window, text='清除', font=('Arial', 12), width=10, height=1,
command=self.parse_hit_click_2)
self.button_2.pack(anchor="e")


def parse_hit_click_1(self):
"""定义触发事件1,调用main函数"""
user_name = self.entry_user.get()
pass_wd = int(self.entry_passwd.get())
self.main(user_name, pass_wd)

def main(self, user_name, pass_wd):
# 网页登录
driver_path = r'D:\python\chromedriver.exe'
driver = webdriver.Chrome(executable_path=driver_path)
driver.get('https://mp.weixin.qq.com/')
time.sleep(2)
# 网页最大化
driver.maximize_window()
# 拿微信扫描登录
time.sleep(20)
# 获得登录的cookies
cookies_list = driver.get_cookies()
# 转化成能用的cookie格式
cookie = [item["name"] + "=" + item["value"] for item in cookies_list]
cookie_str = '; '.join(item for item in cookie)
# 请求头
headers_1 = {
'cookie': cookie_str,
'user-agent':'Mozilla/5.0 (Windows NT 10.0; Win64; x64) AppleWebKit/537.36 (KHTML, like Gecko) '
'Chrome/91.0.4472.77 Safari/537.36'
}
# 起始地址
start_url = 'https://mp.weixin.qq.com/'
response = session.get(start_url, headers=headers_1).content.decode()
# 拿到token值,token值是有时效性的
token = re.findall(r'token=(\d+)', response)[0]
# 搜索出所有跟输入的公众号有关的
next_url = f'https://mp.weixin.qq.com/cgi-bin/searchbiz?action=search_biz&begin=0&count=5&query={user_name}&token=' \
f'{token}&lang=zh_CN&f=json&ajax=1'
# 获取响应
response_1 = session.get(next_url, headers=headers_1).content.decode()
# 拿到fakeid的值,确定公众号,唯一的
fakeid = re.findall(r'"fakeid":"(.*?)",', response_1)[0]
# 构造公众号的url地址
next_url_2 = 'https://mp.weixin.qq.com/cgi-bin/appmsg?'
data = {
'action': 'list_ex',
'begin': '0',
'count': '5',
'fakeid': fakeid,
'type': '9',
'query': '',
'token': token,
'lang': 'zh_CN',
'f': 'json',
'ajax': '1'
}
headers_2 = {
'cookie': cookie_str,
'user-agent': 'Mozilla/5.0 (Windows NT 10.0; Win64; x64) AppleWebKit/537.36 (KHTML, like Gecko) '
'Chrome/91.0.4472.77 Safari/537.36',
'referer': f'https://mp.weixin.qq.com/cgi-bin/appmsgtemplate?action=edit&lang=zh_CN&token={token}',
'sec-ch-ua': '" Not;A Brand";v="99", "Google Chrome";v="91", "Chromium";v="91"',
'sec-ch-ua-mobile': '?0',
'sec-fetch-dest': 'empty',
'sec-fetch-mode': 'cors',
'sec-fetch-site': 'same-origin',
'x-requested-with': 'XMLHttpRequest'
}

# 表的创建
workbook = xlwt.Workbook(encoding='gbk', style_compression=0)
sheet = workbook.add_sheet('test', cell_overwrite_ok=True)
j = 1
# 构造表头
sheet.write(0, 0, '时间')
sheet.write(0, 1, '标题')
sheet.write(0, 2, '地址')
# 循环翻页
for i in range(pass_wd):
data["begin"] = i * 5
time.sleep(3)
# 获取响应的json数据
response_2 = session.get(next_url_2, params=data, headers=headers_2).json()

# jsonpath 获取时间,标题,地址
title_list = jsonpath.jsonpath(response_2, '$..title')
url_list = jsonpath.jsonpath(response_2, '$..link')
create_time_list = jsonpath.jsonpath(response_2, '$..create_time')

# 将时间戳转化为北京时间
list_1 = []
for create_time in create_time_list:
time_local = time.localtime(int(create_time))
time_1 = time.strftime("%Y-%m-%d", time_local)
time_2 = time.strftime("%H:%M:%S", time_local)
time_3 = time_1 + ' ' + time_2
list_1.append(time_3)
# for循环遍历
for times, title, url in zip(list_1, title_list, url_list):
# 其中的'0-行, 0-列'指定表中的单元
sheet.write(j, 0, times)
sheet.write(j, 1, title)
sheet.write(j, 2, url)
j = j + 1
# 窗口显示进程
self.text1.insert("insert", f'*****************第{i+1}页爬取成功*****************')
time.sleep(2)
self.text1.insert("insert", '\n ')
self.text1.insert("insert", '\n ')
# 最后保存成功
workbook.save(f'{user_name}公众号信息.xls')
print(f"*********{user_name}公众号信息保存成功*********")


def parse_hit_click_2(self):
"""定义触发事件2,删除文本框中内容"""
self.entry_user.delete(0, "end")
self.entry_passwd.delete(0, "end")
self.text1.delete("1.0", "end")

def center(self):
"""创建窗口居中函数方法"""
ws = self.window.winfo_screenwidth()
hs = self.window.winfo_screenheight()
x = int((ws / 2) - (800 / 2))
y = int((hs / 2) - (600 / 2))
self.window.geometry('{}x{}+{}+{}'.format(800, 600, x, y))

def run_loop(self):
"""禁止修改窗体大小规格"""
self.window.resizable(False, False)
"""窗口居中"""
self.center()
"""窗口维持--持久化"""
self.window.mainloop()


if __name__ == '__main__':
g = GZHSpider()
g.run_loop()


评论 (0)