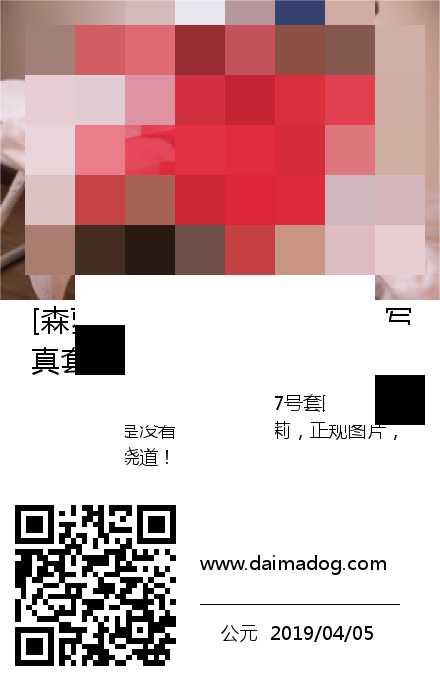
不知道什么时候开始,WordPress站长圈子里流行起搞海报分享。说实话这个功能很鸡肋,个人感觉没卵用,和加js分享一样。明明浏览器自带分享功能,还要自己搞一个······。没办法,谁叫网友们喜欢呢,今天抽空实现了下,只需传入必要的信息,即可生成一张海报图片。好像已经有插件可以做到,但是我这个是纯代码版,可以让高级用户DIY的哟。
实现这个功能需要依赖于PHP的GD库,没有就不行哟,虚拟主机用户要好好看看是否支持哟。主要使用了PHP的复制图像,文本转图像等函数实现的,下面我们一起来看看实现代码。
复制
$im = imagecreatetruecolor(440, 700) or die("不能初始化新的 GD 图像流");//创建一张空白图像
$_bg_color = imagecolorallocate($im, 255,255,255); //创建颜色,返回颜色标识符
imagefill($im, 0, 0, $_bg_color); //初始化图像背景为$_bg_color
$bg=imagecreatefromstring(file_get_contents($bigImgPath));//获取网络图片
$src_info = getimagesize($bigImgPath);	//得到图片大小
$bgsf = imagecreatetruecolor(440, 300);  //创建一个画布
imagecopyresampled($bgsf,$bg,0,0,0,0,440,300,$src_info[0],$src_info[1]);//缩放图像
imagecopymerge($im,$bgsf,0,0,0,0,440,300,100);//复制合成
$_text_color = imagecolorallocate($im, 0,0,0);//文字颜色
$fontpath='msyh.ttf';//字体文件路径
$im=textcl($im,$_text_color,$str,$fontSize,$fontpath,330,'');//处理多行文字
$im=textcl($im,$_text_color,$description,$desfontSize,$fontpath,410,'      ');
$qecode=imagecreatefromstring(file_get_contents($ewm));//获取网络图片
$ewm_info = getimagesize($ewm);	//得到图片大小
imagecopymerge($im,$qecode,10,500,0,0,$ewm_info[0],$ewm_info[1],100);//复制合成
$dateimg = imagecreatetruecolor(200, 200);  //创建一个画布
imagefill($dateimg, 0, 0, $_bg_color); //填充颜色
imagettftext($dateimg, $datefontsize, 0,0, 50, $_text_color,$fontpath,$domain);//文字转图片
imagettftext($dateimg, $desfontSize, 0,0, 90, $_text_color,$fontpath,'————————————————————————');
imagettftext($dateimg, $desfontSize, 0,20, 120, $_text_color,$fontpath,$datestr);
imagecopymerge($im,$dateimg,200,520,0,0,200,200,100);//复制合成
header("Content-type: image/png"); //以图像类型输出
imagepng($im);//展示图像
imagedestroy($im); //销毁图像,释放资源
哈哈哈,是不是觉得很好理解?每一行都有注释哟。这里要说两句,有个字体文件,这个大家喜欢什么字体就去下载什么字体就好,字体文件是多平台通用的,不用担心不兼容。还有一个多行文字转图片的问题,我这里把它写成了一个方法,对于标题和描述都可以使用,节省代码。
复制
//自动文字换行计算
function textcl($img,$_text_color,$str,$fontSize,$fontpath,$Y,$before){
	 for ($i=0;$i<mb_strlen($str);$i++) {
             $letter[] = mb_substr($str, $i, 1,'utf-8');
         }
         $content=$before;
         foreach ($letter as $l) {
           $teststr = $content." ".$l;
           $fontBox = imagettfbbox($fontSize, 0, $fontpath, $teststr);
           if (($fontBox[2] > 400) && ($content !== "")) {
               $content .= "\n";
           }
       $content .= $l;
   }
   imagettftext($img, $fontSize, 0, ceil((440 - $fontBox[2]) / 2), $Y, $_text_color, $fontpath, $content );
   return $img;
}
参数说明
- 图像载体
- 字体颜色
- 字符串内容
- 字体大小
- 字体路径
- 添加在字符串之前(用于首行缩进)
使用方法
准备必须内容,主要有以下内容:
- $bigImgPath=’最上面的图片链接’;
- $str =’标题’;
- $description=’描述(注意有字数限制,不然会超出图像)’;
- $ewm=’https://www.daimadog.org/qrcode.php?cont=https://www.daimadog.org/4077.html&rc=L&size=150′; //二维码图像地址,我这里使用的是代码狗博客提供的二维码生成接口
- $datestr=’时间字符串’;
- $domain=’域名字符串’;
- $fontSize=22;//标题字体大小,22磅
- $desfontSize=14;//描述字体大小
- $datefontsize=14;//日期字体大小
给一个上图的生成参数大家对照下就明白了:
- $bigImgPath=’https://imgcdn.daimadog.org/2019/03/0007-300×200.jpg’;
- $str =’哈哈哈哈哈敏感内容标题替换’;
- $description=’哈哈哈哈哈敏感内容标题替换哈哈哈哈哈敏感内容标题替换哈哈哈哈哈敏感内容标题替换哈哈哈哈哈敏感内容标题替换’;
- $ewm=’https://www.daimadog.org/qrcode.php?cont=https://www.daimadog.org/4077.html&rc=L&size=150′;
- $datestr=’公元 2019/04/05′;
- $domain=’www.daimadog.org’;
- $fontSize=22;
- $desfontSize=14;
- $datefontsize=14;
好了,有这些就可以正常生成图像链接了,不喜欢这个结构的可以自行diy哟,diy需要注意合成图片时的图像显示位置坐标,字符串转图像时的显示坐标哟。


评论 (11)