之前讲了很多关于WordPress优化的文章,今天讲讲服务器php-fpm优化启用慢日志检测耗时长的PHP脚本的方法。虽然通过nginx accesslog可以记录用户访问某个接口或者网页所消耗的时间,但是不能清晰地追踪到具体哪个位置或者说函数慢,而php-fpm的慢日志却可以做到,所以为了优化服务器环境提升服务器性能,开启php-fpm慢日志检测耗时长的PHP脚本非常有必要。
php-fpm.conf的配置文件中有一个参数request_slowlog_timeout是这样描述的
复制
 The timeout for serving a single request after which a PHP backtrace will be
 dumped to the 'slowlog' file. A value of '0s' means 'off'.
 Available units: s(econds)(default), m(inutes), h(ours), or d(ays)
 Default Value: 0
 request_slowlog_timeout = 0
当request_slowlog_timeout 设为一个具体秒时request_slowlog_timeout =1,表示如果哪个脚本执行时间大于1秒,会记录这个脚本到慢日志文件中
request_slowlog_timeout =0表示关闭慢日志输出。
慢日志文件位置默认在php的安装目录下的log文件夹中,可以通过修改slowlog = log/$pool.log.slow参数来指定。
复制
 The log file for slow requests
 Default Value: not set
 Note: slowlog is mandatory if request_slowlog_timeout is set
 slowlog = log/$pool.log.slow
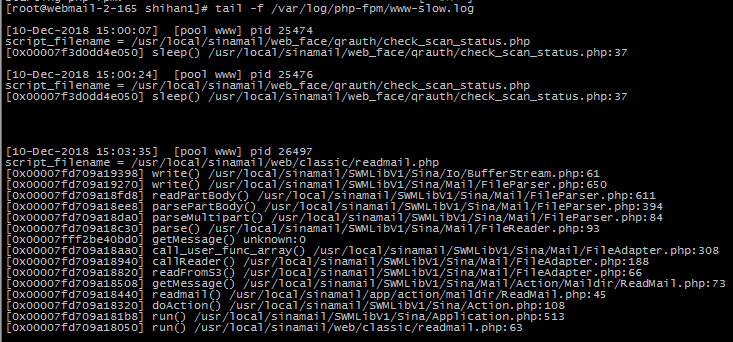
php-fpm慢日志的例子,慢日志会记录下进程号,脚本名称,具体哪个文件哪行代码的哪个函数执行时间过长。
复制
[27-May-2016 13:20:37] NOTICE: child 16683 stopped for tracing
[27-May-2016 13:20:37] NOTICE: about to trace 16683
[27-May-2016 13:20:37] NOTICE: finished trace of 16683
[27-May-2016 13:20:37] WARNING: [pool www] child 16720, script '/Data/webapps/test/public/index.php' (request: "POST /index.php/test/test/") executing too slow (1.204894 sec), logging
request_slowlog_timeout 和 slowlog需要同时设置,开启request_slowlog_timeout的同时需要开启 slowlog,慢日志路径需要手动创建
具体开启php-fpm慢日志步骤:
复制
cd /apps/php

vi /apps/php/etc/php-fpm.conf
去掉request_slowlog_timeout 、slowlog的前缀分号';',设置request_slowlog_timeout =1;
:wq
保存退出
创建慢日志目录
mkdir -p /apps/php/etc/log
重启php-fpm
killall php-fpm
/apps/php/sbin/php-fpm


评论 (0)